Thanks to the impressive advances in both software and hardware in the past decade, it’s never been simpler (or more affordable) to create high-quality recordings at home. It really is astounding just how far home studio recording has come. What used to require high-end, specialized hardware now gets taken care of in an audio interface that could cost less than $100.
Getting the right gear in place is one thing. Configuring your home studio space so that it’s acoustically friendly to the type of music you’re making? That’s another thing entirely. There are plenty of hurdles to doing this well.
One of these hurdles is cost: you may simply not have the funds to remodel the room you’re using, top to bottom. Aesthetics is another concern. If your home studio is doing double duty as a home office, guest room or some other function, you may not be the favorite family member if you start gluing acoustic foam panels everywhere in the space.
You also sometimes have to deal with architectural issues that can’t be changed. If you’re set up in the basement with low ceilings and concrete floors, the architecture of the space creates some issues. Or if your home studio is a spare bedroom, it might share a wall with tiny humans who want to sleep while you want to record.
Whatever your situation, chances are your acoustic space needs some acoustic help.
Acoustic panels are one of the simplest and most affordable solutions for taming reflective sound and excessive reverberation. They aren’t the end-all solution to every problem, but they do accomplish quite a bit in many sonic environments.
You can buy premade acoustic panels, and we’ll give some of our top recommendations at the end of this guide. However, if you want total control over the size, look, and amount of sound absorption, it’s best to build your own DIY acoustic panels.
The good news is that DIY acoustic panels aren’t that difficult to build. Even musicians with a little DIY phobia should be able to get good results with the instructions we’ve put together.
Below, we’ll outline every step you need to create impressive-looking DIY acoustic panels that function well and don’t look like something out of a cheap sci-fi set.
But before we do, let’s take a few moments to talk about what DIY sound panels are used for. Before you invest in the materials and start building, it’s important to know what they can and cannot do in your space.
Quick Hint: If it any point you decide that building your own DIY acoustic sound panels is not worth the hassle, scroll down to the bottom where we also recommend a few affordable alternatives that you can purchase already built for you.
Before You Begin: Understanding Acoustic Panels
If you’ve ever visited a professional recording studio, you probably saw a space with beautiful hardwood floors and many rich, reflective surfaces. You also saw rugs, tapestries, thick curtains, and paneling or acoustic foam.
If you think about the acoustic properties of those elements, it might seem a little confusing. What’s going on here? Why have bright, reflective surfaces and sound-absorbing surfaces in the same space?
The answer, generally speaking, is the pursuit of the perfect acoustic space. Well, sort of.
Building the perfect acoustic space is both art and science, and it can be maddeningly complex. To make matters worse, “the perfect acoustic space” is kind of a lie in that there isn’t just one. The perfect acoustic space for recording, say, high church choral music is a truly abysmal acoustic space for recording a classic rock record.
In the context of recording, what you’re really trying to do is create as controllable a space as possible, one that performs well for the kinds of music you’re making. The reflective surfaces can add beauty and reverberation to many types of audio performance, including singing and acoustic instruments.
(Love the store or hate it, Guitar Center puts all its acoustic guitars in a sealed, wood-lined room for a reason. Those guitars sound amazing in there!)
It’s All About Control
No matter what kind of music you’re making, too much reflection can out of control, fast. And electronic instruments tend toward feedback that much more quickly. That’s where the acoustic treatments come into play. They partially absorb sound waves that hit them, helping to soften negative acoustic effects in your recording space or control room.
When to Use Acoustic Panels
Using acoustic panels is all about reducing unwanted reflectiveness, brightness, reverb and overall volume. If your space is bright and loud, acoustic panels or studio foam can soften up the sound.
To put it another way, you may need to install some acoustic treatments if you’re dealing with too much reverb, unpleasant reflected sound, or an uncomfortable build-up of sound pressure in your home studio.
If you also deal with muddy or weak bass in your room, adding a studio monitor subwoofer helps you hear the low end with better accuracy. It’s one of the easiest upgrades for improving mixes that rely on deep bass.
What to use and where to place them gets complicated quickly. You can get deeply scientific about it if you want, but most at-home musicians are going to take a more practical approach: get or build some panels, and then just experiment with placement.
When to Avoid Acoustic Panels
If you’re doing mostly vocal and acoustic recording at home, you’re unlikely to need much in the way of acoustic panels (or acoustic foam). You probably want all the brightness and reverberation you can get so that you can capture all those beautiful overtones present in acoustic and vocal music.
The same thing goes if your recording space is already too dull for your liking. Adding acoustic panels is going to make the space even duller and more muddled.
The 8 Steps to Build DIY Acoustic Panels for Your Home Studio
Now that you know what DIY acoustic panels can and can’t do, you should have a solid idea of whether they are the solution you need. If so, here’s what to do.
Step One: Decide on Material Types, Sizes, Look
Most DIY acoustic panels use one of two materials for the majority of the sound absorption: Rockwool or fiberglass insulation. You could also use acoustic foam, but this product tends to be more expensive and more finicky. It’s best used independently, rather than inside a panel.
Rockwool is a stone wool product that’s natural and fiberglass-free. It can be purchased in cut sizes, like 23 by 47 inches. It’s dense but squishable, so it will adapt to any variance in your frame size. (Novice carpenters, rejoice!)
Rockwool boasts an STC rating of 52 when installed properly in ceilings, meaning that very loud sounds can only be faintly heard through it. (Of course, it functions differently in an acoustic panel, but the high STC rating is still important.)
You can also use classic fiberglass insulation. However, since Rockwool has none of the downsides of fiberglass (synthetic, itchy, hard to work with), we recommend you go with Rockwool.
If you want to make your DIY build even easier, get a premade board-style product like Rockwool Rockboard. Building a frame around this type of material is even easier than building one for the looser or squishier variety.
Beyond choosing your sound-absorbing material, you also need to decide on sizes and look. You can create acoustic panels of just about any size. If you go with the 23-inch-wide Rockwool, though, sticking with a 24-inch width is the simplest option.
Before you start ordering supplies, take the time to measure various wall spaces in your home studio. Come up with a plan for how many panels you want to build and what sizes they need to be. It’s worth mentioning at this point that most DIY acoustic panels get mounted to the wall. In some cases, you’ll want to suspend some from the ceiling as well.
Most DIY plans for building an acoustic panel include covering it in fabric, and that’s the last decision you need to make. Find a reasonably thick yet breathable fabric (upholstery fabrics are ideal, and felt fabrics work well, too). Then simply select a pattern that works well in your space. For more on picking the right type of fabric, see Step Four below.
Step Two: Gather Needed Materials and Tools
Next, you’ll need to ensure you have all the materials and tools needed for the job. Feel free to modify the instructions below as you deem necessary for your space. If you do, don’t forget to make whatever adjustments to this list those modifications require.
Here’s what you’ll need as far as materials:
- Rockwool or fiberglass insulation (Rockwool Rockboard recommended)
- Wood for building the frame (furring strips or cut plywood will work)
- Wood glue
- Wood screws
- Heavy-duty picture frame hangers (2 per panel)
- D-ring hangers (2 per panel)
- Fabric enough to wrap around the frame
- Spray adhesive (if using board-style insulation)
Again, some specifics will vary depending on your choices of insulation and fabric, but this basic list should get you started.
If you want to get creative as far as mounting goes, you can use the following materials:
- Flush mount brackets and furniture bumpers can give you a better wall mount
- Screw-eye hooks and chains will help you hang your DIY sound panels from the ceiling
In addition to the right set of materials, you’ll also need a few tools to get the job done. Make sure you have access to the following before beginning:
- Drill with appropriate drill bit and screwdriver bit
- Circular saw
- Staple gun
- Hammer
- Fabric scissors
Step Three: Build a Wood Frame
Once you’ve gathered everything you need and made your materials and shape decisions, the next step is to build the wood frame for each panel. Cut furring strips into two sections of matching length so that you can shape a rectangular frame with two inches of depth.
If you’re using board-style insulation panels, you can simply position your wood around the four sides, then mark where to cut. If you’re using looser insulation products, you’ll have to create a frame based on the measurements of your space and then manipulate the insulation to fit (in a later step).
Once you have the dimensions set, drill a hole through the two pieces at each corner. Apply a layer of wood glue in the joint, then set a screw through the hole you drilled in each corner. With board-style products, you’ll want to build the frame around the product for the best fit. (And see Step Four before you proceed any further— these two steps are more or less done at the same time.)
If you’re using looser insulation, you might choose to add a plywood backing to your acoustic panel. It’s not ideal from an acoustics point of view, but it can help your insulation product to stay in place. There’s a better alternative mentioned below in the upholstering step, but we figure it’s worth mentioning the plywood option at this point.
After you complete your frame, you’ll need to leave it alone for 24 hours for the wood glue to cure. (But if you’re using the board-type product, read Step Four before you stop for the night!)
Step Four: Insert the Acoustic Product
Once your frame has been assembled, it’s time to insert your insulation product into the frame. First, let’s talk about what to do with a more solid board-style insulation product.
Board-Style Insulation
If you’re using a board-style product, you’ll actually want to insert it before you step away to let the wood glue dry in Step Three. Spray each edge of the insulation board with spray adhesive and then slide it into the frame. If you’re building the frame around the insulation board in place, just be sure to spray the adhesive before you put the wood pieces into position for the final time.
Looser Insulation Types
If you’re using looser forms of insulation, you don’t need to use any additional adhesive. The insulation should generally expand to fit the frame. Just place the insulation product into the wood frame and move on to the next step. Just don’t try to pick up the frame at this point, or the insulation could start to fall out.
Step Five: Choose an Appropriate Fabric
The fabric that you choose to cover your DIY acoustic panels matters from an acoustical point of view. Of course, it’s a good idea to pick up something that you like to look at, because you’re going to be staring at it for years to come. But there are a few factors you need to consider besides the look of it.
Above all else, you need to choose a fabric that is acoustically transparent or close to it. Remember, the goal here is to absorb sound, and the sound has to be able to get through to the insulation if that’s going to happen.
Look for breathable fabrics or thicker textiles with a visible weave. Anything that lets sound through should be good for acoustic panel use. Burlap is an attractive fabric that gives an earthy yet industrial look, and it’s exceptionally breathable, too.
With this in mind, avoid vinyl products, leather, or any fabric with a synthetic or non-breathable backing. A thicker upholstery fabric can be effective since it will also absorb a small amount of sound. Just make sure it’s not acoustically reflective (through a lining or backer, perhaps).
You can also find purpose-built acoustic textiles like those from Guilford of Maine. These can get expensive, though, so most DIY recording enthusiasts don’t go this route.
Step Six: Upholster the Panel
There’s a difference in how you’ll do this depending on the type of insulation product you chose. If you chose a board-style product, you can simply wrap the fabric around the back edge of the frame and staple it into place on the back of the wood. The adhesive will hold the insulation in place, so the back can be open.
With this type, measure the fabric with roughly an inch or two of extra material on each side. So, if your frame is 25 inches wide (23 inches for the insulation and an additional inch on each side for the wood), you’ll measure 31 inches of fabric in that direction. That’s 25 for the width, plus two inches for the depth on both sides, plus an additional inch (at least) of extra material on each side (25+2+2+1+1). The extra inch is all you need to wrap around and staple in — just don’t forget about the depth measurement.
If you use looser insulation material, you’ll need to do a little more work. If you didn’t apply a plywood backing in step three, you’ll need to wrap your upholstery all the way around. The upholstery is what will help the insulation keep its shape (in addition to the frame).
With this method, you’ll measure and cut the fabric like you would wrapping paper. It needs to cover all edges, front and back, top and bottom. The top and bottom dimensions still just need the one inch of excess (plus whatever you need for depth), but the side-to-side measurement is basically doubled.
Not Sure About Dimensions?
If you’re unsure of your measurements and don’t want to risk cutting your fabric wrong, test this process out with actual wrapping paper. Once you’re certain about the dimensions, cut the fabric to match.
Step Seven: Test Out Your Acoustic Panels
As we mentioned earlier, the ideal placement of acoustic treatments is both an art and a science. You may choose to dive deep into the science of panel placement, or you might decide to go by feel or what’s practical.
Either way, before you permanently mount your DIY acoustic panels, you’ll want to make sure they’re doing what you want them to do.
Find a way to temporarily place your acoustic panels where you plan to mount them. You might have to prop them up on nearby equipment or find some other creative ways to temporarily hang them. Even setting them on the floor against the wall below where you intend to hang them is better than nothing.
Once you’ve temporarily set up your panels, start up some audio from a recent project. Listen for a few minutes and decide whether the panels are accomplishing what you want. If they aren’t, try repositioning them and see if you get a better outcome.
If the sound is now too muddled, take some panels out. If it’s still too bright and live, you might need more panels (or better panel placement).
Once you’re convinced that your placement is working well, proceed to Step Eight.
Step Eight: Mount the Panels to the Wall
The final step in this process is mounting your panels to the wall. The process works pretty much just like hanging a hefty picture frame. Install two sets of hangers (such as D-ring hangers) on the rear of each panel, then set two picture hangers into the wall at the appropriate distance. Hang the panel by the D-rings, and that’s it.
Note that if you’re having issues with too much bass resonance, your DIY acoustic panels won’t help very much when flush with the wall. (The science here is interesting: it has to do with the physical length of the low-frequency sound waves, which can be several feet in length!)
You’ll generally want at least an inch or two of space. Furniture bumpers can be used to generate a bit of space, and a well-positioned D-ring hanger can function just fine with the bumpers in place.
Other Hanging Methods: Ceiling and Hanging Acoustic Panels
Some at-home artists need a way to tame a highly reflective ceiling. Often, it’s simpler to use sound foam or studio foam on a ceiling. The lighter weight poses less of a mounting difficulty (plus less danger in the event that some acoustic foam should fall down).
Ceiling-Mounted Acoustic Panels
That said, mounting a DIY acoustic panel on the ceiling is possible. You’ll need eye hooks or drywall anchors with attached hooks and some picture-hanging wire.
Safely drill into the ceiling at appropriate measurements slightly in from the four corners of the panel, placing picture-hook or eye-hook drywall anchors. Alternatively, use standard drywall anchors (with an appropriate weight rating) and screw eye-hook screws into them.
Affix small D-ring hangers to the four rear inside edges of the wood frame, then use a small length of picture-hanging wire to attach each D-ring hanger to the hardware in the ceiling. You should now have a floating DIY acoustic panel mounted from the roof.
Hanging Acoustic Panels
The process for angled or hanging acoustic panels is nearly identical to the process for ceiling-mounted panels. If you want a panel to hang vertically, use only two anchors and two D-ring hangers. Affix the D-ring hangers to the top edge of the frame rather than the rear.
For angled hanging panels, use the four mounts as described above. Vary the length of picture-hanging wire to achieve the desired angle.
An Alternative: Buy, Don’t DIY
Creating and installing your own DIY acoustic panels can be a rewarding project that creates results. If you enjoy DIYing, it can be a lot of fun, too! But we know not every reader enjoys DIY work, and that’s OK. If you’d prefer to skip the entire DIY process, you can.
Here are our top recommendations if you’d rather pick up some commercially produced acoustic treatments.
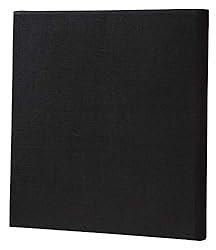
Acoustimac Sound Absorbing Acoustic Panel

Acoustimac produces some attractive acoustic panels with impressive noise reduction ratings. These panels are two inches thick and measure four feet by two feet. They look great and are available in five neutral colors.
With an average NRC rating of .95 (that’s on a scale of 0 to 1, with 1 being the best), these panels absorb a lot. They’re great for treating the acoustics in your home studio, and they do a pretty good job at general sound reduction, too.
Installation is fairly simple, and the hardware is included. For an aesthetic boost, split your order between two colors and arrange them in an interesting pattern.
Check current prices on Amazon for the Acoustimac Sound Absorbing Acoustic Panels
ATS Acoustic Panels

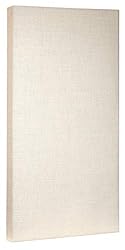
Acoustic panels by ATS are exactly the sort we described in the DIY section, but built to exacting commercial specifications. These panels use Guilford of Maine acoustic fabric, solid wood frames, and ASTM E84 Class A fire-rated materials. To top it off, they’re crafted in the USA.
ATS offers its quality acoustic panels in a variety of sizes, including 2x4, 2x3, and 2x2. Mix and match sizes and colors to create a mural of acoustic panels.
Check current prices on Amazon for the ATS Acoustic Panels - 2x2 SIZE
Check current prices on Amazon for the ATS Acoustic Panels - 2x3 SIZE
Check current prices on Amazon for the ATS Acoustic Panels - 2x4 SIZE
Auralex Acoustics Studiofoam Wedgies

If you’re looking for a professional-grade acoustic foam option, one you can stick just about anywhere, Auralex is one of our favorite brands. These 12-inch square panels are two inches thick and have an NRC rating of 0.80. These are professional-grade and have the price tag to match, but you won’t be disappointed by the performance.
Check current prices on Amazon for the Auralex Acoustics Studiofoam Wedgies
Studio Foam Acoustic Foam Panels (48 12-inch squares)
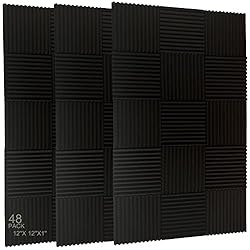
If you’re looking for the look of a studio control room and are on a tight budget, this set of 48 square acoustic foam panels is a great place to start. The wedge design and high-density foam are best at reducing mid and high frequencies.
The NRC here is only 0.4, so it’s not a complete soundproofing solution. Still, this form of tile can be an important piece of the puzzle, especially if you’re having issues with higher frequencies.
Check current prices on Amazon for the Studio Foam Acoustic Foam Panels (48 12-inch squares)
Studio Wedge Acoustic Foam Panels (3D Pyramid)

A more mid-grade but still affordable acoustic foam panel, these 3D pyramid style studio foam panels have a greater absorption ability, with an overall NRC rating of 0.75. They’re thicker, landing at 2.8 inches thick at the peaks of the pyramids
As with all foam-based panel products, these are least effective at the lowest frequencies and most effective on the high end.
Check current prices on Amazon for the Studio Wedge Acoustic Foam Panels (3D Pyramid)
Thin and Dense Acoustic Panels
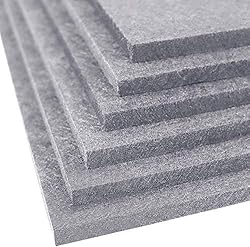
These panels are extremely thin at 0.4 inches, but they are rated with an astounding 0.9 NRC rating. These are polyester panels that can be mounted directly to the wall. Because they’re so thin and light, you can use simple mounting methods such as Command strips or spray adhesive.
Numerous colors are available, so you can mix and match to create the visual you’re looking for.
The only con here is the look. They aren’t the most attractive panels we’ve seen, and they don’t look particularly professional. Despite the look, we’re impressed with the functionality of this product.
Check current prices on Amazon for the Thin and Dense Acoustic Panels